

Showing posts with label Blogger Widgets. Show all posts
Showing posts with label Blogger Widgets. Show all posts
Sharing is caring, we all know that. You are alone working on your blog without sharing it on Socail Networks, then i think its a bad habit. What happens if all other people start to share your posts on their profile? You will get more audience and more hits to your blog. We cannot live with going social. We must not ignore this thing that we are social animals. I have already shared the method to add share buttons to your blog posts. That method was by addthis.com, this new share buttons are by sharethis.com.

|| Twitter Tweet Button
|| Google+ Share Button
|| Facebook Share Button
|| Pinterest Share Button
|| Digg Share Button
|| StumbleUpon Share Button
Show at Home Page
If you want to show these share buttons on homepage as well, you need to modify the above code. This will help you to show these buttons at the end of every post at homepage. Use this modified code
Before You Go
You can rearrange these share buttons by changing the location of these colored tags. This is so easy, as you can see mine. I've arranged them according to the popularity of these social networks. Cheers, comment if you have anything to say.
What’s Awesome?
The best thing about them is that these contain Pinterest share button. As a blogger I know that Pinterest is an awesome source of traffic. These buttons are easy to load, even if a person is having a slow connection, he may not any problem with them. It has StumbleUpon, Twitter, Google + share button as well. Well lets start the tutorial now.
Adding Share Buttons
- Sign in to your Blogger account
- Go to Template > Edit HTML
- Click the box “Expand Widget Template”
- Search for this tag:
- Paste this code above it:
- Now search for this:
<data:post.body/>
Share Button Code
Put this code just below that tag, it will show share buttons at the end of the Blogger Posts.<b:if cond='data:blog.pageType == "item"'> <span class='st_fblike_hcount' displayText='Facebook Like'/> <span class='st_twitter_hcount' displayText='Tweet'/> <span class='st_plusone_hcount' displayText='Google +1'/> <span class='st_facebook_hcount' displayText='Facebook'/> <span class='st_pinterest_hcount' displayText='Pinterest'/> <span class='st_digg_hcount' displayText='Digg'/> <span class='st_stumbleupon_hcount' displayText='StumbleUpon'/></b:if>|| Facebook Like button
|| Twitter Tweet Button
|| Google+ Share Button
|| Facebook Share Button
|| Pinterest Share Button
|| Digg Share Button
|| StumbleUpon Share Button
Show at Home Page
If you want to show these share buttons on homepage as well, you need to modify the above code. This will help you to show these buttons at the end of every post at homepage. Use this modified code<span class='st_fblike_hcount' displayText='Facebook Like'/> <span class='st_twitter_hcount' displayText='Tweet'/> <span class='st_plusone_hcount' displayText='Google +1'/> <span class='st_facebook_hcount' displayText='Facebook'/> <span class='st_pinterest_hcount' displayText='Pinterest'/> <span class='st_digg_hcount' displayText='Digg'/> <span class='st_stumbleupon_hcount' displayText='StumbleUpon'/>What i did? i just removed this simple code from above code
<b:if cond='data:blog.pageType == "item"'> </b:if>
Before You Go
You can rearrange these share buttons by changing the location of these colored tags. This is so easy, as you can see mine. I've arranged them according to the popularity of these social networks. Cheers, comment if you have anything to say.
If you are not satisfied with Older Posts and Newer Posts in your Blogger and you want to change it to numbered page navigation then you can do it in 1 min.
To see the live demo of page navigation check my blog ;)

Change the background image here
You can change the numbers of posts per page.
Change the text you want to show instead of Prev Page and Next Page
Now Drag this widget at the bottom of the "Blog Posts" widget as we did in our previous post Add Share Buttons To Blogger

READ MORE
To see the live demo of page navigation check my blog ;)

- Go to Blogger Dashborad
- Click on the blog that you want to change
- Goto Design Tab Followed by Page Element
- Then Click on the Add a Gadget
- Select HTML gadget and paste the following code in it.
<!-------------sarakuj.com Page Navigation------------------>
<style type="text/css">#blog-pager{font-size:normal}.showpageArea{font-family:verdana,arial,helvetica;color:#000;font-size:11px;margin:10px}.showpageArea a{color:#000;text-shadow:0 1px 2px #fff;font-weight:bold}.showpageNum a{color:#000;padding:3px 8px;margin:0 4px;text-decoration:none;border:1px solid #999;-webkit-border-radius:3px;-moz-border-radius:3px;background:#f8b5a4 url(https://blogger.googleusercontent.com/img/b/R29vZ2xl/AVvXsEjMaz-AuBYesxuZnNxTtOyBm5lJIKPFyEkhiLCCBCvy5p4AGVpKiVKKeDckIjLrLCnBNedRoolKN8eXyQZRuIHV5FSmEJMrqas-xnAHlE4g_BFQKifL_wGaPeK0TwgkEiFmTUmebdNoyL75/s1600/w2b_pagenav1.png) 0 -60px repeat-x}.showpageNum a:hover{border:1px solid #888;background:#f7cac9 url(https://blogger.googleusercontent.com/img/b/R29vZ2xl/AVvXsEjMaz-AuBYesxuZnNxTtOyBm5lJIKPFyEkhiLCCBCvy5p4AGVpKiVKKeDckIjLrLCnBNedRoolKN8eXyQZRuIHV5FSmEJMrqas-xnAHlE4g_BFQKifL_wGaPeK0TwgkEiFmTUmebdNoyL75/s1600/w2b_pagenav1.png) 0 -30px repeat-x}.showpageOf{margin:0 4px 0 0}.showpagePoint{color:#666;padding:3px 8px;margin:2px;font-weight:bold;-webkit-border-radius:3px;-moz-border-radius:3px;border:1px solid #999;background:#f2f0f0 url(https://blogger.googleusercontent.com/img/b/R29vZ2xl/AVvXsEjMaz-AuBYesxuZnNxTtOyBm5lJIKPFyEkhiLCCBCvy5p4AGVpKiVKKeDckIjLrLCnBNedRoolKN8eXyQZRuIHV5FSmEJMrqas-xnAHlE4g_BFQKifL_wGaPeK0TwgkEiFmTUmebdNoyL75/s1600/w2b_pagenav1.png) 0 -5px repeat-x;text-decoration:none} </style>
<script style='text/javascript'>
var postperpage=5;
var numshowpage=3;
var upPageWord="Prev Page";
var downPageWord="Next Page";
var home_page="/";
var urlactivepage=location.href;
</script>
<script style='text/javascript' src='http://sarakuj.googlecode.com/files/pnavi.js'></script>
<!-------------sarakuj.com Page Navigation------------------>
Change the background image here
You can change the numbers of posts per page.
Change the text you want to show instead of Prev Page and Next Page
Now Drag this widget at the bottom of the "Blog Posts" widget as we did in our previous post Add Share Buttons To Blogger

If you want to show recommended post slide at the end of the every post. Then its your time, you can simply add this widget to your blog in no time.

That's all . now you can see the Recommended slide in your blogger post.if you have any doubts in adding the widget, feel free to comment here.

Why Add This Gadget
This gadget will help you to make you users more busy on your site. Your users will become more involved instead of just spending 1 min and going away. Your visitor will know more about your blog, they must know that they are not on a dead blog.How To Add
Go to your blogger dashboard, select the blog which you want to use. Go to Layout > Add a Gadget > select html gadget<style type="text/css">#recslide{z-index:5;width:400px;height:100px;padding:10px;background-color:#fff;border-top:3px solid #000;position:fixed;right:-430px;bottom:0;-moz-box-shadow:-2px 0 5px #aaa;-webkit-box-shadow:-2px 0 5px #aaa;box-shadow:-6px -5px 5px #aaa; font-family:Arial, Helvetica, sans-serif;}#recslide p{font-size:11px;text-transform:uppercase;font-family:Arial,Helvetica,sans-serif;letter-spacing:1px;color:#000;Â Â Â font-weight: bold;}#recslide_title{color:#555;font-weight:700;font-size:16px;margin:10px 20px 10px 0;}#recslide a,#recslide a:hover,#recslide_title{text-decoration:none;color:#FE3F10;Â Â Â padding: 5px 5px 5px 2px;}#recslide .close,#recslide .expand,#recslide .help{border:2px solid #EEE;cursor:pointer;color:#9A9AA1;width:13px;height:15px;padding:2px 0 0 5px;position:absolute;right:10px;font-size:17px;font-weight:700;font-family:Arial, Helvetica, sans-serif;font-size:12px;}#recslide .help{right:35px;}#recslide_image{float:left;width:80px;}#recslide_title{width:287px;height:30px;overflow:hidden;}</style><div id="recslide" style="display:none;"> <div class="help">?</div><div class="expand">+</div> <div class="close">X</div> <p>Recommended for you</p><div id="recslide_image"></div><div id="recslide_title">Loading..</div><center><div id="share_box">loading</div></center></div><script> if(document.location.href.split("/").length==6&&document.location.href.indexOf(".html")!=-1){if(typeof bts_onload_queue=='undefined')var bts_onload_queue=[];if(typeof bts_dom_loaded=='boolean')bts_dom_loaded=false;else var bts_dom_loaded=false;if(typeof bts_async_loader!='function'){function bts_async_loader(src,callback,id){var script=document.createElement('script');script.type="text/javascript";script.async=true;script.src=src;script.id=id;var previous_script=document.getElementById(id);if(previous_script)if(previous_script.readyState=="loaded"||previous_script.readyState=="complete"){callback();return}else{script=previous_script}if(script.onload!=null)previous_callback=script.onload;script.onload=script.onreadystatechange=function(){var newcallback;if(previous_script&&previous_callback)newcallback=function(){previous_callback();callback()};else newcallback=callback;if(bts_dom_loaded){newcallback()}else bts_onload_queue.push(newcallback);script.onload=null;script.onreadystatechange=null};var head=document.getElementsByTagName('head')[0];if(!previous_script)head.appendChild(script)}}if(typeof bts_domLoaded!='function')function bts_domLoaded(callback){bts_dom_loaded=true;var len=bts_onload_queue.length;for(var i=0;i<len;i++){bts_onload_queue[i]()}}bts_domLoaded();bts_async_loader("http://ajax.googleapis.com/ajax/libs/jquery/1.7.1/jquery.min.js",function(){bts_async_loader("http://sarakuj.googlecode.com/files/recomended.js",function(){},"bts-out-slide")},"jQueryjs")}</script>Now you are done, you can test it. it you face any problem then let me know. Comments are always welcome. :)
Before You Go
If you want slide come out whenever you reach the end of post, then follow this instruction:- Click the Template->Edit HTML(if you are using old blogger interface,then Design->Edit HTML)
- Click the "Expand Widget"
- Find one of the following line:
<div class='post-footer-line post-footer-line-1'>
or
<p class='post-footer-line post-footer-line-1'>
or
<data:post.body/> - Immediately below any of these, add the following code and save Template:
<b:if cond='data:blog.pageType == "item"'>
<div style='display:none' id='recslide_place_holder'></div>
</b:if>
That's all . now you can see the Recommended slide in your blogger post.if you have any doubts in adding the widget, feel free to comment here.
If your Blog is full of contents and have too lengthy posts then you can add "Back to Top" button to your Blog (or Website). It helps your readers prevent scrolling again and again to go to top.
What you have to do is simply
- Login to your Blogger
- Select Blog you want to use
- Go to Design Tab
- Add Widget
- Select HTML Widget and put this code below

<!-------------sarakuj.com Send to Top Code------------------><a href='#' style='display:scroll;position:fixed;bottom:5px;right:130px;' title='Back to Top'><img src='https://blogger.googleusercontent.com/img/b/R29vZ2xl/AVvXsEgD49RyGEItZfYLLNZkAerxORbhPVs5xsPs5Asi6tkd2ZxaxP_lNaZDpeiDfC5PXEDRxDhMU11clF3gSsvSrOYTImwohIeAcrMe51IK_BxVIvrP3bi_HFIzWqzfCs5HxsUsegWynv_yJoM/s320/sarakuj.com-top.png' alt="SaraKuj.Com" width="40" height="45"/></a> <!-------------http://sarakuj.com ------------------>
Facebook is the largest social networking site with more than 400 million active users and is growing larger every day! Make sure to use these Facebook widgets for your website or blog to connect with your large Facebook audience. You can use these tools to easily share certain profile information, websites, blogs, and businesses with the Facebook community.

Here are some Facebook widgets for your site or blog :)
Like Button
Allows facebook users to share web pages from your website on their profile.

Lets your users comment on your website content with their Facebook account.
Recommendations
Provides your website users with personalized suggestions for pages to visit.
Live Stream
Lets Facebook users to post and share content in real-time.
Activity Feed
Lets users know what their facebook friends are doing on your website through comments and likes.
Login Button
Displays a login button along with profile pictures of facebook friends who have already signed up.
Facepile
Shows profile pictures of people who have liked your facebook page or have signed up for your webpage.
Registration
Another way for users to sign up for your site.
Sharing is caring, and we all know that social networks are the best resource to get easy traffic. You must add social sharing buttons to your blog. This widget will help you to put share buttons on your blog and it supports more then 300 sharing website buttons. Ok follow my steps now.

Adding Buttons
- go to Addthis
- Register a free account to create share buttons.
- Then Click on the Get Addthis at the top tab
- You will get a window like below, select platform, style, and click on Install.

When you will click in Install, a new window will be opened as below. Simply click on Add Widget.

Please note that your Widget must be placed at the bottom of the "Blog Post" widget as shown in the screenshot.
Go to Blogger Design Tab > Page Element and drag that widget at the bottom of the Posts. Enjoy
Related posts plugins give bloggers the tools they need to help their visitors find interesting content. Usually placed at the end of a blog post or article, a related posts plugin can help engage your readers with your site as they are exposed to so much more of your great content than they normally would without such a plugin. Using a related posts plugin has been shown to improve overall site stats by increasing traffic and page views by an average of 6%, while also decreasing bounce rates and keeping readers on your site for longer.

Let me tell you how you can add this widget to your blog easily.
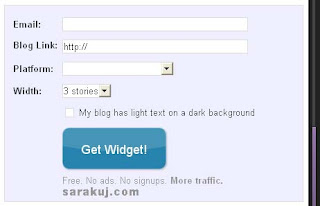
Now follow the instructions coming up and install your Widget to your blog.

Let me tell you how you can add this widget to your blog easily.
- Go to Linkwithin
- Fill the form shown at the homepage of the site and click on Get Widget
- Select platform e.g. Blogger, Wordpress etc
- Select number of stories to display
- Remember to check the check box if your blog has light text on a dark background

Now follow the instructions coming up and install your Widget to your blog.
Related posts plugins give bloggers the tools they need to help their visitors find interesting content. Usually placed at the end of a blog post or article, a related posts plugin can help engage your readers with your site as they are exposed to so much more of your great content than they normally would without such a plugin. Using a related posts plugin has been shown to improve overall site stats by increasing traffic and page views by an average of 6%, while also decreasing bounce rates and keeping readers on your site for longer.
Let me tell you how you can add this widget to your blog easily.
Now follow the instructions coming up and install your Widget to your blog.
Let me tell you how you can add this widget to your blog easily.
- Go to Linkwithin
- Fill the form shown at the homepage of the site and click on Get Widget
- Select platform e.g. Blogger, Wordpress etc
- Select number of stories to display
- Remember to check the check box if your blog has light text on a dark background
Now follow the instructions coming up and install your Widget to your blog.


