


What is Awesome?
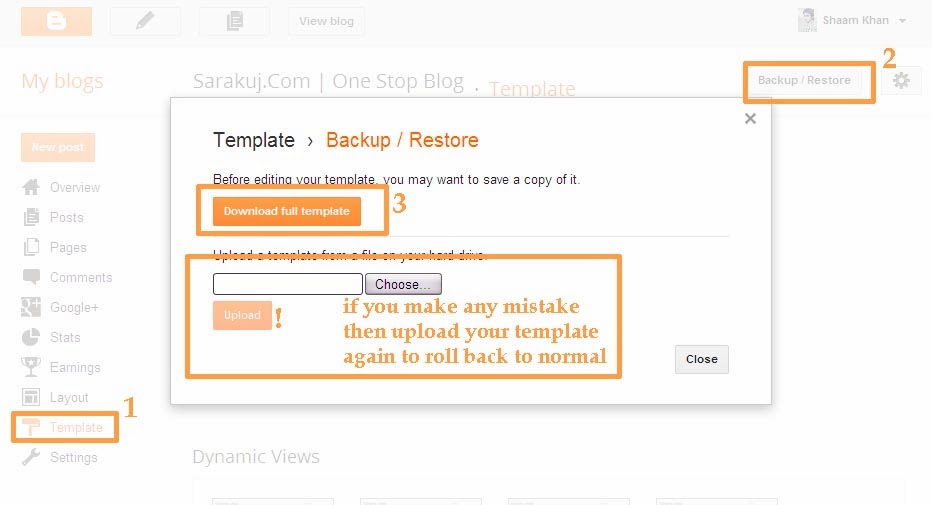
Backup your Template
- Log in to your blogger account
- Open your blog
- Go to Templates > Backup/Restore
- Click on “Download Full Template”
- Download your blogger template and you are done :)
Method
- Login to your blooger accout
- Open your blog which you want to change
- Go to Templates > Edit HTML
- Click Expand Widget Templates
- Now search for this tag
summary_noimghere you will find a code something like this,
<script type='text/javascript'>var thumbnail_mode = "no-float" ;
summary_noimg = 385;
summary_img = 285;
img_thumb_height = 120;
img_thumb_width = 170;
</script>
summary_img = 285 indicates the length of the summary text when your post has any image in it.
Similarly the second code indicates the width and height of the image thumbnails. Here you can increase or decrease the anything you want.
Before You Go
This method is on for those users who use external blogger template. I mean if you use any third part blogger template then this is effective for you. try it and tell me if you face any problem. This trick is for posts shown at the homepage, it will not hurt your original post when you open it. :)
What’s Awesome?
The best thing about them is that these contain Pinterest share button. As a blogger I know that Pinterest is an awesome source of traffic. These buttons are easy to load, even if a person is having a slow connection, he may not any problem with them. It has StumbleUpon, Twitter, Google + share button as well. Well lets start the tutorial now.
Adding Share Buttons
- Sign in to your Blogger account
- Go to Template > Edit HTML
- Click the box “Expand Widget Template”
- Search for this tag:
- Paste this code above it:
- Now search for this:
<data:post.body/>
Share Button Code
Put this code just below that tag, it will show share buttons at the end of the Blogger Posts.<b:if cond='data:blog.pageType == "item"'> <span class='st_fblike_hcount' displayText='Facebook Like'/> <span class='st_twitter_hcount' displayText='Tweet'/> <span class='st_plusone_hcount' displayText='Google +1'/> <span class='st_facebook_hcount' displayText='Facebook'/> <span class='st_pinterest_hcount' displayText='Pinterest'/> <span class='st_digg_hcount' displayText='Digg'/> <span class='st_stumbleupon_hcount' displayText='StumbleUpon'/></b:if>|| Facebook Like button
|| Twitter Tweet Button
|| Google+ Share Button
|| Facebook Share Button
|| Pinterest Share Button
|| Digg Share Button
|| StumbleUpon Share Button
Show at Home Page
If you want to show these share buttons on homepage as well, you need to modify the above code. This will help you to show these buttons at the end of every post at homepage. Use this modified code<span class='st_fblike_hcount' displayText='Facebook Like'/> <span class='st_twitter_hcount' displayText='Tweet'/> <span class='st_plusone_hcount' displayText='Google +1'/> <span class='st_facebook_hcount' displayText='Facebook'/> <span class='st_pinterest_hcount' displayText='Pinterest'/> <span class='st_digg_hcount' displayText='Digg'/> <span class='st_stumbleupon_hcount' displayText='StumbleUpon'/>What i did? i just removed this simple code from above code
<b:if cond='data:blog.pageType == "item"'> </b:if>
Before You Go
You can rearrange these share buttons by changing the location of these colored tags. This is so easy, as you can see mine. I've arranged them according to the popularity of these social networks. Cheers, comment if you have anything to say.

Let me share the different methods to post on blog by using your mobile phone.
Operamini 7 and Operamini 4.4 Methods
Operamini is the most popular browser for mobiles. Let me share you simple tricks to use Operamini for blogging.1. Open blogger.com and log in to your account.
2. If you cannot view properly then open settings of Operamini by pressing #+8. Turn on single column view. (in opera mini 4.4 its called Mobile View).
3. Go to the folling link to post a new article. http://www.blogger.com/blog-this.g
4. Here you can post to your blog. Simply give title of your post, write article in textarea and publish.
The only problem with this method is that you cannot Label your post. But you should keep posting by this method and whenever you get access to a computer you can Lable all posts togather.
Operamini 12 s60v3
I really dont use this browser but the best thing about this browser is that it supports flash websites. You can view *.gif images and flash content in it. You may also be able to blog by it although i didn't test it yet.The bad thing about Operamini 12 is that its RAM eater. It can suck you RAM when you open large web page. It may lead your phone to go hanged. If your smart phone RAM is less then 64MB then don't use it.
After knowing all the little bugs if you still wanna download Operamini 12 then click here.
Blogging via Email
Google has already a feature which is called Mail-to-blogger. It can turn your smart phone into a blogging application. All you have to do is set it up.1. Log in to you blogger acount from PC.
3. Select your blog which you want to set up to post via email.
2. Go to Settings > Mobile and Email you can set up a Mail-to-Blogger address which you will use to send posts via email to your blog. The format of the email address is username.secretword@blogger.com as show in screen shot.

Please keep this email secret or anyone will be able to post on your behalf. Also check the options shown here to publish posts immediately or draft them. Expample
The subjects of your emails will be the titles of your posts, and the body of the emails will be the text. All the image attachments will be published as post images. To avoid any expected bug in text please put #end tag at the end of your post.
Blogger Applications (not for Symbian)
Google has launched its offical blogger Andriod application. I dont know why Nokia doesn't launch any blogger application. I am afraid everybody is soon gonna kick Symbian phones.Android Blogger Applications
1. Blogger
2. Blogger-droid
3. Bloggerroid
Before You Go
If you post images in your article by using any image host. Then these images may not be shown in Mobile view of Blogger thumbnails. To avoid this go to google image search and search images by using the following trick. Type this text in search bar.
site:blogspot.com Your keyword here
Replace the underlined text by your keyword. Now google will show only those images which are hosted on blogspot blog. You can use these images to avoid that thumbnail bug i mentioned above.
Demo

What is Awesome?
This trick will give more professional look to your blog, you blog share buttons will not look like the external part of any site. Reader will take your blog more seriously, your traffic will increase. What else a blogger need when his traffic is insreased?Method to Modify
Now follow my steps to set this Trick.
- Log in to Blogger
- Click on the Blog you want to change
- Add share buttons to your blog
- Leave step 3 if you've already added share buttons. Then open already added html widget
- Now add this code below.
<!-------------sarakuj.com AddThis------------------>
<script type='text/javascript'>
var addthis_config = {
ui_cobrand: "SaraKuj.Com",
ui_header_color: "#000000",
ui_header_background: "#eeeeee"
}
</script>
<!-------------sarakuj.com AddThis----------------->
Add this code at the end of the addthis code.

Change site name to your site name and click on save. Don't forget to like and share. Sharing is Caring :).
If your Blog is full of contents and have too lengthy posts then you can add "Back to Top" button to your Blog (or Website). It helps your readers prevent scrolling again and again to go to top.
What you have to do is simply
- Login to your Blogger
- Select Blog you want to use
- Go to Design Tab
- Add Widget
- Select HTML Widget and put this code below

<!-------------sarakuj.com Send to Top Code------------------><a href='#' style='display:scroll;position:fixed;bottom:5px;right:130px;' title='Back to Top'><img src='https://blogger.googleusercontent.com/img/b/R29vZ2xl/AVvXsEgD49RyGEItZfYLLNZkAerxORbhPVs5xsPs5Asi6tkd2ZxaxP_lNaZDpeiDfC5PXEDRxDhMU11clF3gSsvSrOYTImwohIeAcrMe51IK_BxVIvrP3bi_HFIzWqzfCs5HxsUsegWynv_yJoM/s320/sarakuj.com-top.png' alt="SaraKuj.Com" width="40" height="45"/></a> <!-------------http://sarakuj.com ------------------>
Blogger recently upgraded and now its a good news for you that Bloggers can add meta description to Blogger. Its the description that is shown when your blog is shown in search engines.

Enabling and adding meta description to multi-post pages
- Go to Settings > Search preferences > Meta tags > Description and click the Edit link.

- Click the Yes radio button to enable search description.
- Enter the meta description for your blog. This meta description will appear on your homepage and other multi-post pages.
- Click Save Changes button.

Adding meta description to individual pages

- Click Posts and select a post to edit.
- Click Search Description option under Post settings. (This option appears only after you enabled search description in step 1)
- Enter the meta description for the post and click Done.
For older posts, you have to go back to edit each post and manually add in the description.
But before you do that, it’s better to confirm if this feature works on your blog template.
My 404 Error

Blogger's default error is as below
"Sorry, the page you were looking for in this blog does not exist."
To change your 404 Error, simply Log in to your Blogger account. (you must be using the new Blogger dashboard)
Go to Settings > Search preferences > Custom Page not Found. > Click Edit to open the text box. Type whatever you would like to appear on the page, then click on "Save Changes".


